Isometric Camera
A game camera and how it interacts with the player is a very vital system and it is one of the first system that I tackled in this project. For this initial version of the isometric camera I wanted to focus on two main bits of functionality.
Functionally Goals
1: Move the camera to the next room following the player as they navigated the level
2: In larger rooms(area that are larger than the screen size) have the camera smoothly follow the player within the isometric bounds of the room.
Isometric Dungeon Camera 1.0
Demonstration of the isometric camera follow
Use Cases and Solution
For the first was it was relatively easy, at least compared to the second one. For this I went with a camera target game object that represented the center of the room or where the camera would be centered. Then I used an isometric box trigger collider with a script that would just switch the camera to this new target.
The only issue with this approach is that Unity3D does not have an isometric box collider (at least at the time of writing this). An easy work around was to use the poly collider, set the number of points to 4, and set their vector2 values to equal the isometric bounds of the room. Setting these “Room Camera Triggers” as a prefab eliminated the tedium of the initial setup and could easily be dragged and dropped onto any future room.
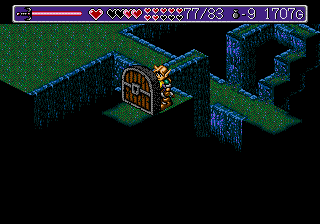
The second was a tad more difficult. The main issue is that if you simply have the camera centered over the player while they are in these larger area then you have a lot of wasted negative space if the player is walking against on of the walls. To fix this you would use a bounding box and the camera would not move outside of this box. The problem with this approach in an isometric use case is that normally you would have a max/mix x/y values and each frame it would check where the player was and snap its x and/or y values if it was outside that limit, but with an isometric that mix/max value is not as easy to pin down. For Example, depending on the player location the max Y value would be a different value due to the slope caused by the "tilted" presentation of an isometric room.
After a great deal of testing and experimentation I came up with the following solution.


Examples of negative space cause by centering the camera on the player in Landstalker (Sega 1992)
The approached that I ended up using was to first have an array of points. These points being the transform positions of children in the parent camera trigger game object. These children objects could be moved around in the editor and at runtime four edge colliders would be created, connecting those points to form a box. This is different from the isometric box collider that I created early as edge colliders only really know that they have been crossed [no entering and exiting]. From there each camera update would draw a line from the camera to the player. If that line did not cross and edge collider the camera would just center over the player, however if it did cross an edge collider it would then take that line and an "isometric" angle from the player to calculate where on that edge collider line the camera should stop. See the below video for a demonstration of how that camera follow works.
This was an fun system and use case to work on. The solution was not as striate forward as a typical top down action adventure game and required a bit of creative thinking as well as logical reasoning with the Unity3d tools available. The reduction of negative space allows the player to be more focused on the level and gameplay. This will also allow future level designs to incorporate larger and more complex room. both of which will enhance the over all gameplay experience for the player. I will continue to iterate on the system desgin as well as expand it functionality as the project grows.
Future Enhancements
With The basics in place the next steps with this system would be to add the following...
Player Look Offset: When the player starts to move in a direction have the camera shift off the player in that direction. The goal being that they can see a little further in the direction that they are moving.
Enemy Targeting: When the player targets an enemy ensure that both the player and the target are on screen.
Cinematic Controls: Add controls to the camera that will allow an event to control it. The goal begin to allow the game to show the player something relevant to what is happening, but may not be within the current screen [example: a far off door opens after a switch is pulled]


